If you’re in Sacramento, Roseville, Rancho Cordova, or Davis, CA, you can save production time and avoid extra art charges on your screen printing order by providing us with the right kinds of files. Your finished product will also look much better. Please take a moment to read the following guidelines.
Kinds of files
Vector files
At Screenprintit, we use vector files to create nearly all of our artwork. These files are made up of lines (vectors), not pixels. They can be scaled up or down without losing image quality. These files usually end with AI, EPS, or PDF. For these kinds of files, we only support Adobe Illustrator. Some images (photos, for example) cannot be created in Illustrator. These are known as raster files.
Raster files
An image comprised of pixels is known as a RASTER image. It is made up of tiny squares (pixels). The quality is determined by the number of pixels (or dots) per inch (DPI). Unlike vector art, raster images LOSE quality when you make them bigger. For these kinds of documents, we only accept Adobe Photoshop files. These files usually end with PSD, TIF, or PDF.
Note: Most pixel based documents will require a separation art charge.
File Sizes
Please provide files at 100% of printed size. For acceptable sizes, see Standard Imprint Areas below. If you’re submitting Photoshop files, create them at 300 DPI at 100% print size. For larger images (like those for banners), 125 DPI is fine. DO NOT send us a JPEG, GIF, or any other file from the web. These low-quality files are not suitable for printing.
Note: Most pixel based documents will require a separation art charge.
Colors
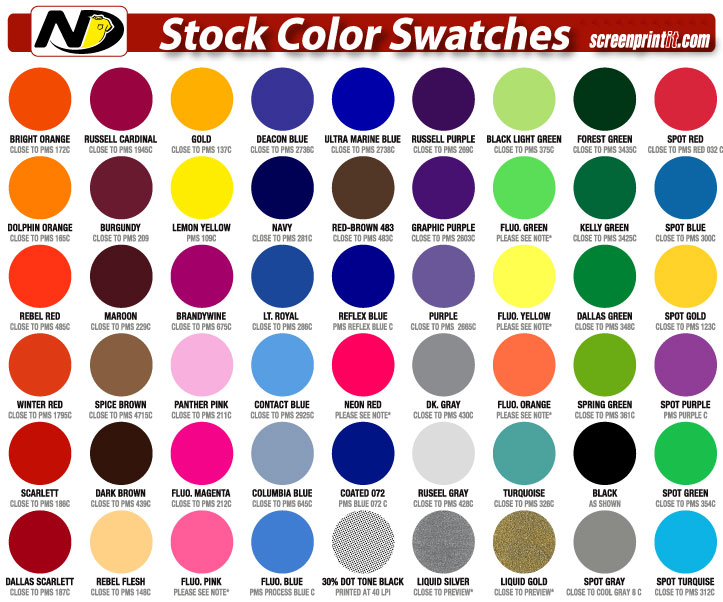
Choose from our stock colors and avoid mixing charges. Need a special color mix? Use Pantone Matching System (PMS) coated ink swatches. Convert your color swatches to SPOT colors.
Note: additional $12.50 per color charge.
Shading
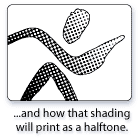
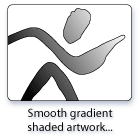
If your image has any shading, it will be screen printed using halftone dots. Most of the time, halftone dots are fine. In some cases, however, the shading can be more distracting than beneficial. The images to the right show a smooth-shaded original and an example of what it might look like screenprinted. If halftone dots are NOT an option, consider printing them on our Direct Digital printer.
Text
Convert ALL TEXT to outlines (paths). In Illustrator, it’s called Create Outlines and it’s under the Type menu. In Photoshop, it’s called Rasterize Type and it’s under the Layer menu. This allows us to open your file without any font issues. Please don’t send us your fonts. If you use Corel Draw or Freehand, export your file as an Adobe Illustrator file and convert text to paths.
Submitting Artwork
-Standard E-mail is sufficient
– ZIP or STUFF your files and send via email
or
– Upload files to our FTP site
-Send us a CD or portable USB device
or
– Upload files to our FTP site.
Follow the directions on the screen.
(Please note, upload time will take a few minutes and will vary depending on your connection speed.)
We recommend you ZIP (compress) your files when sending multiple or large documents.
Please remember to call us once you have finished uploading your file. You will receive an e-mail confirming your file was uploaded. (916) 971-3939
Things to Avoid
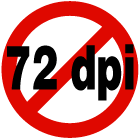
- DO NOT send us files 72 dpi or smaller.
- DO NOT apply trapping to your art.
- DO NOT send web files (GIF, JPEG, or PNG).
Standard Imprint Areas for Shirts
- Full Front or Big Back (adult): 12” wide x 12” high (Max. imprint size 15” wide x 16” high).
- Full Front or Big Back (youth): 9” wide x 9” high.
- Left Chest: 4” square (3.5” square if above pocket).
- Center Chest: 6” – 8” wide.
- Adult Long Sleeve: 3.5” wide x 16” high.
- Short Sleeve: 3.5″ wide x 3.5″ high.
*Sizes are not absolute but should be used as a general reference. The smallest shirt in your order will dictate the maximum size of your artwork.